Redis5.x哨兵搭建手记
前提
Redis5.x之后,单机、哨兵、集群搭建的难度已经简化。鉴于目前看到太多文章都是复制粘贴以往一些3.x版本的一些内容,所以打算基于当前Redis的最新版本做一次单机、哨兵和集群的搭建,记录一下过程步骤和遇到的问题。编写本文的时间是2019年10月6日(国庆假期…..),当前Redis的最新版本为5.0.5。操作系统用的是虚拟机里面安装的CentOS 7。先确定已经安装好Redis服务,可以参考笔者写的前一篇文章:《Redis5.x单机服务搭建手记》。出于书写习惯,本文有可能把哨兵称为Sentinel、Redis Sentinel、哨兵或者Redis哨兵,这四个名词是等价的。
哨兵简介
一定要有一个概念:哨兵实例也是特殊的Redis实例,也就是哨兵实例是独立的进程,多个哨兵实例可以搭建主从(Master-Slave),它们承担的职责和普通的Redis实例不一样。下面是官方文档中对哨兵的介绍:
Redis哨兵为Redis提供了高可用性,意味着可以使用哨兵创建Redis服务部署,该部署可以在无需人工干预的情况下抵御某些类型的故障。Redis哨兵还提供其他功能,如监视、通知,并且为客户端提供配置入口(acts as a configuration provider for clients)。下面是Redis哨兵提供的完整功能列表:
- 监控(
Monitoring):Sentinel会不断检查Master实例和Slave实例是否按预期工作。 - 通知(
Notification):Sentinel可以通过API进行通知受监控的Redis实例出现问题。 - 自动故障转移(
Automatic Failover):如果Master实例未按预期工作,则Sentinel可以启动故障转移程序,在该过程中,会将一个Slave实例提升为Master实例,将其他Slave实例重新配置为使用新的Master实例,并且会通知使用Redis实例的应用程序获取新的地址、连接信息。 - 提供配置入口(
Configuration provider):Sentinel充当客户端服务发现的授权来源(a source of authority):客户端连接到Sentinel,可以询问Redis服务群中的Master实例的地址。如果发生故障转移,Sentinel将通知客户端新的Master实例的地址。
Sentinel的分布式性质
Redis Sentinel是一个分布式系统,Sentinel采用同一份配置多个Sentinel进程共同协作运行的设计,多Sentinel进程协作的优势如下:
- 多个
Sentinel实例就给定的主机不再可用这一事实达成共识时,将执行故障检测,从而降低了误报的可能性。 Sentinel群中即使不是所有Sentinel处于可用状态,Sentinel群仍然能够正常工作,进行故障转移。
哨兵搭建
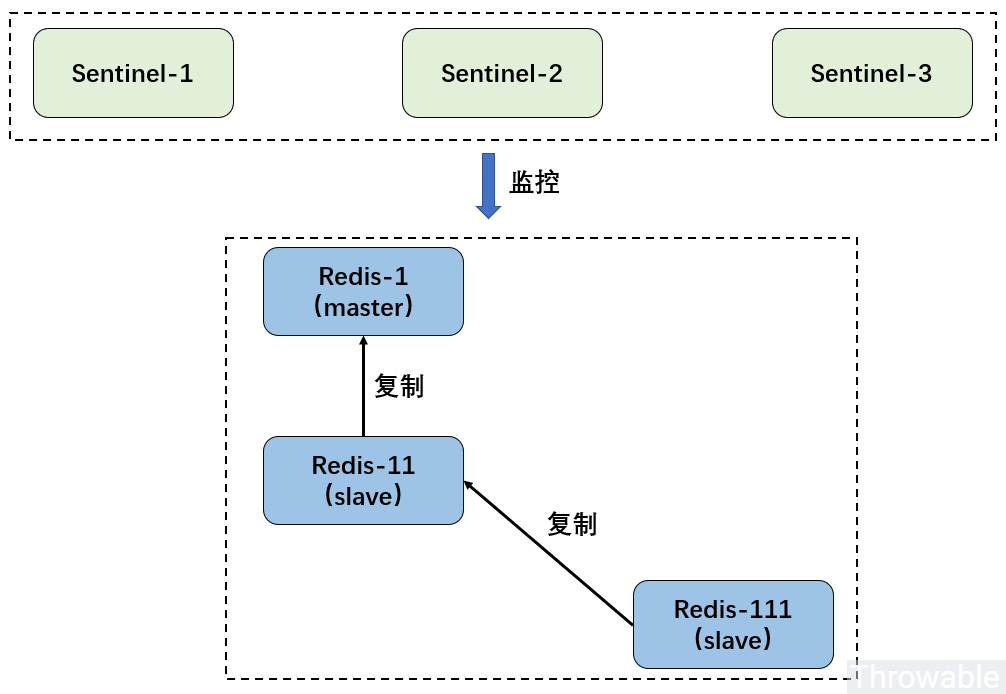
当前的Redis哨兵版本称为哨兵2,哨兵版本1是Redis 2.6的时候引入,现在已经过期,不推荐使用。官方文档中部署哨兵的示例中指出:一个健壮的部署至少需要三个Sentinel实例。再加上一般情况下,普通的Redis服务实例为了保证健壮性需要搭建树状主从,至少建议部署三个实例。这里的部署拓扑图如下:
环境配置
按照部署拓扑图,一共部署6个Redis实例,3个普通的Redis实例组成Master-Slave,并且是树状主从,3个Redis哨兵实例。为了简单起见,6个Redis实例部署在同一个虚拟机中,注意在生产或者测试环境要分散机器部署,避免所有鸡蛋放在同一个篮子出现机器单点故障。具体信息如下:
| 实例标识 | 角色 | 主机IP | 端口 | 备注 |
|---|---|---|---|---|
Sentinel-1 |
- | 192.168.56.200 |
26379 | - |
Sentinel-2 |
- | 192.168.56.200 |
26380 | - |
Sentinel-3 |
- | 192.168.56.200 |
26381 | - |
Redis-1 |
Master |
192.168.56.200 |
6380 | - |
Redis-11 |
Slave |
192.168.56.200 |
6381 | Redis-1的从节点 |
Redis-111 |
Slave |
192.168.56.200 |
6382 | Redis-11的从节点 |
Sentinel配置和配置文件创建
先看样板配置文件sentinel.conf的内容:
port 26379 |
完整的配置属性列表比较少,而port、daemonize、pidfile、logfile、dir、bind等属性上一篇文章已经分析过,这里不再复述。
sentinel monitor <master-group-name> <ip> <port> <quorum>
master-group-name:被监控的目标Master实例的名称,这个值可以自定义。ip:被监控的目标Master实例的服务器地址。port:被监控的目标Master实例的端口。quorum:仲裁参数,设置需要多少个Sentinel实例同意才能判断一个被监控的Redis实例失效。换言之,一个Sentinel群需要获得系统中多数Sentinel的支持, 才能发起一次自动故障迁移。如果我们使用3个Sentinel实例,那么这个值可以定义为2。
sentinel monitor配置项比较特殊,主要用来指定Master角色Redis服务的链接信息。其他5个配置项采用下面的格式:
sentinel <option_name> <master-group-name> <option_value> |
down-after-milliseconds:定了Sentinel认为被监控的Redis服务已经断线的总毫秒数。如果在指定的毫秒数之内,被监控的Redis服务没有向Sentinel回复PING信息或者回复了Error信息,那么Sentinel会开始认为被监控的Redis服务下线(其实这里是主观下线(subjectively down,简称SDOWN)。parallel-syncs:指定了在执行故障转移时,最多可以有多少Slave实例同时对新的Master实例进行同步,这个数字越小,完成故障转移所需的时间就越长。这里建议参考样板配置中的值,设置为1。failover-timeout:故障转移超时时间,单位为毫秒。deny-scripts-reconfig:是否禁用SENTINEL SET命令运行时修改notification-script和client-reconfig-script,默认值为yes。auth-pass:配置连接Master实例的认证密码,如果Master实例没有设置密码,可以不配置此项属性。
创建3份Sentinel配置文件26379.conf、26380.conf、26381.conf,它们的内容十分相似,这里只列出26379.conf的内容(192.168.56.200是笔者虚拟机的主机地址):
port 26379 |
另外,创建3份Redis服务的配置文件6380.conf、6381.conf、6382.conf,它们的内容十分相似,这里只列出6380.conf(主节点)的内容:
port 6380 |
6381.conf(从节点)尾部添加额外配置:
slaveof 192.168.56.200 6380 |
6382.conf(从节点)尾部添加额外配置:
slaveof 192.168.56.200 6381 |
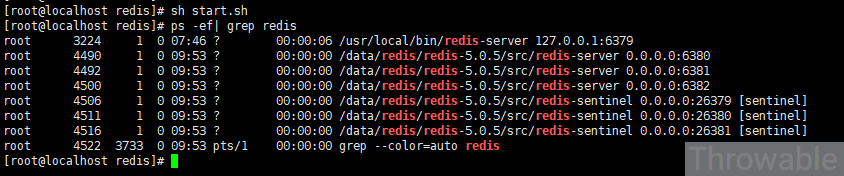
每份配置记得替换好对应的端口号,都准备好了之后,依次启动主节点、两个从节点和3个Sentinel(可以把命令写成一个start.sh,调用sh start.sh):
/data/redis/redis-5.0.5/src/redis-server /data/redis/6380.conf |
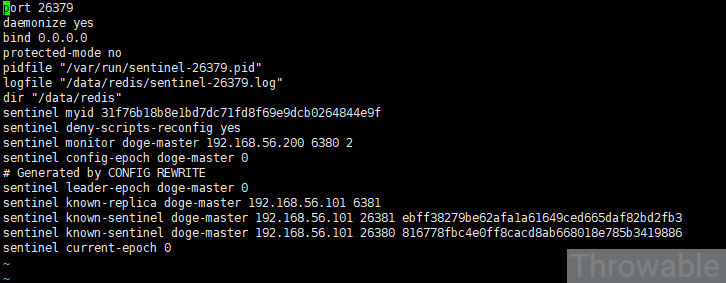
此时查看哨兵的配置,发现被Redis修改,新增了发现的主从信息和哨兵实例信息:
查看一下哨兵实例的日志:

目前哨兵和Redis服务都正常运作。
模拟故障转移
官方文档中建议使用测试命令让Redis实例Sleep一个时间,从而触发故障转移:
redis-cli -p [port] DEBUG sleep 30 |
先查看当前的Master实例:
[root@localhost ~]# redis-cli -p 26379 |
再对Master实例执行Sleep命令:
redis-cli -p 6380 DEBUG sleep 40 |
该命令会阻塞直到40秒后,控制台释放后,再查看当前的Master实例:
127.0.0.1:26379> SENTINEL get-master-addr-by-name doge-master |
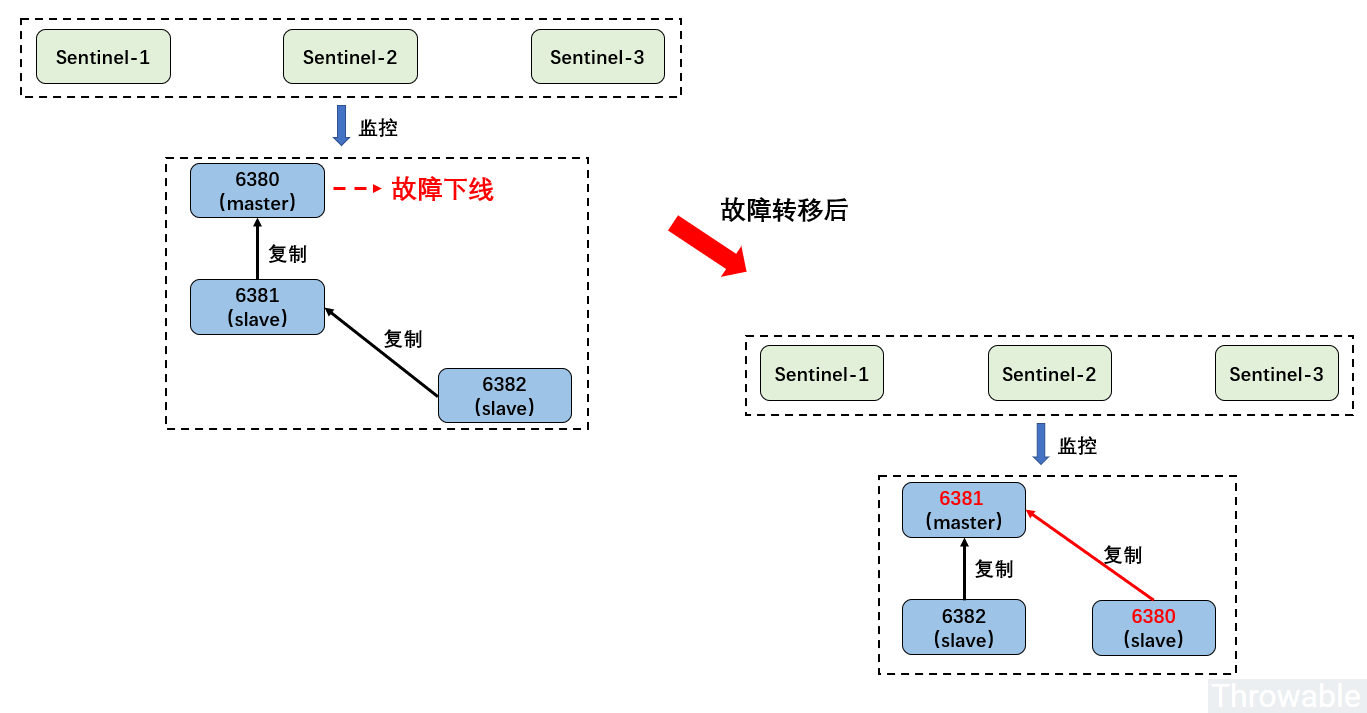
可见,已经成功切换Master实例为6381。那么,当前的Master-Slave的拓扑关系到底是怎么样的?这个时候先看一下Sentinel的日志:

这里可以看出了,恢复后的6380实例重新成为了Slave角色,感觉有点翻车了,原来的树状主从部署变回了一主多从,笔者开始不相信,于是从当前的Master实例查看了一下主从信息:

确实如此,再检查了一下旧的主节点6380的配置:
port 6380 |
发现,最后一行被新增了内容,它成为了从节点。这一点如果不实践,恐怕不知道会衍生出这种结果。画了个图表明一下整个过程:
这个问题暂时不深入探究,目前知道结果如此即可。
客户端代码测试
既然哨兵搭建完了,可以用Java客户端连接进行一些简单的操作。使用的是Lettuce驱动:
<dependency> |
测试代码:
|
输出结果:
PING:PONG |
小结
Redis哨兵搭建相对简单,但是需要注意Redis主从配置和Sentinel配置,一些命令可以直接写成shell脚本方便一键shutdown或者重启。在测试故障转移的时候发现了树状主从会变成一主多从,这个问题后面会分析。
参考资料:
(本文完 c-1-d e-a-20191007)